Crea e transpila circuiti su backend personalizzati
# Added by doQumentation — required packages for this notebook
!pip install -q numpy qiskit rustworkx
# Don't use SVGs for this file because the images are too large,
# and the SVGs are much larger than their PNGs equivalents.
%config InlineBackend.figure_format='png'
```json

{/* cspell:ignore multichip interchip Lasciate ogne speranza voi ch'intrate */}
{/*
  DO NOT EDIT THIS CELL!!!
  This cell's content is generated automatically by a script. Anything you add
  here will be removed next time the notebook is run. To add new content, create
  a new cell before or after this one.
*/}

<details>
<summary><b>Versioni dei pacchetti</b></summary>

Il codice in questa pagina è stato sviluppato utilizzando i seguenti requisiti.
Si consiglia di usare queste versioni o versioni più recenti.
qiskit[all]~=2.4.0
</details>
{/* cspell:ignore LOCC */}

Una delle funzionalità più potenti di Qiskit è la capacità di supportare configurazioni di dispositivi uniche. Qiskit è progettato per essere indipendente dal fornitore dell'hardware quantistico che utilizzi, e i provider possono configurare l'oggetto `BackendV2` con le proprie proprietà di dispositivo specifiche. Questo argomento mostra come configurare il tuo backend personalizzato e transpilare circuiti quantistici su di esso.

Puoi creare oggetti `BackendV2` unici con geometrie o basis gate diversi e transpilare i tuoi circuiti tenendo conto di quelle configurazioni. L'esempio seguente illustra un backend con un reticolo di qubit disgiunto, i cui basis gate sono diversi lungo i bordi rispetto all'interno del bulk.

## Comprendere le interfacce Provider, BackendV2 e Target \{#understand-the-provider-backendv2-and-target-interfaces}

Prima di iniziare, è utile capire l'utilizzo e lo scopo degli oggetti [`Provider`](../api/qiskit/providers), [`BackendV2`](../api/qiskit/qiskit.providers.BackendV2) e [`Target`](../api/qiskit/qiskit.transpiler.Target).

- Se hai un dispositivo quantistico o un simulatore che vuoi integrare nell'SDK Qiskit, devi scrivere la tua classe `Provider`. Questa classe ha un unico scopo: ottenere gli oggetti backend che fornisci. Qui vengono gestite tutte le operazioni di credenziali e/o autenticazione richieste. Una volta istanziato, l'oggetto provider fornirà un elenco di backend e la possibilità di acquisire/istanziare i backend stessi.

- Le classi backend forniscono l'interfaccia tra l'SDK Qiskit e l'hardware o il simulatore che eseguirà i circuiti. Includono tutte le informazioni necessarie per descrivere un backend al Transpiler, in modo che possa ottimizzare qualsiasi circuito in base ai suoi vincoli. Un `BackendV2` è composto da quattro parti principali:
  - Una proprietà [`Target`](../api/qiskit/qiskit.transpiler.Target), che contiene una descrizione dei vincoli del backend e fornisce un modello del backend per il Transpiler
  - Una proprietà `max_circuits` che definisce un limite al numero di circuiti che un backend può eseguire in un singolo job
  - Un metodo `run()` che accetta le richieste di esecuzione
  - Un insieme di `_default_options` per definire le opzioni configurabili dall'utente e i loro valori predefiniti

## Creare un BackendV2 personalizzato \{#create-a-custom-backendv2}

L'oggetto `BackendV2` è una classe astratta utilizzata per tutti gli oggetti backend creati da un provider (sia all'interno di `qiskit.providers` che in un'altra libreria come [`qiskit_ibm_runtime.IBMBackend`](../api/qiskit-ibm-runtime/ibm-backend)). Come accennato in precedenza, questi oggetti contengono diversi attributi, tra cui un [`Target`](https://docs.quantum.ibm.com/api/qiskit/qiskit.transpiler.Target). Il `Target` contiene informazioni che specificano gli attributi del backend — come la [`Coupling Map`](https://docs.quantum.ibm.com/api/qiskit/qiskit.transpiler.CouplingMap), l'elenco delle [`Instructions`](https://docs.quantum.ibm.com/api/qiskit/qiskit.circuit.Instruction) e altri — al Transpiler. Oltre al `Target`, è possibile definire dettagli a livello di pulse come il [`DriveChannel`](https://docs.quantum.ibm.com/api/qiskit/1.4/qiskit.pulse.channels.DriveChannel) o il [`ControlChannel`](https://docs.quantum.ibm.com/api/qiskit/1.4/qiskit.pulse.channels.ControlChannel).

L'esempio seguente illustra questa personalizzazione creando un backend multi-chip simulato, dove ogni chip ha una connettività heavy-hex. L'esempio specifica il set di gate a due qubit del backend come [`CZGates`](../api/qiskit/qiskit.circuit.library.CZGate) all'interno di ogni chip e [`CXGates`](../api/qiskit/qiskit.circuit.library.ECRGate) tra i chip. Per prima cosa, crea il tuo `BackendV2` e personalizza il suo `Target` con gate a uno e due qubit in base ai vincoli descritti in precedenza.

<Admonition type="tip" title="libreria graphviz">
Per visualizzare una coupling map è necessario che la libreria [`graphviz`](https://graphviz.org/) sia installata.
</Admonition>

```python
import numpy as np
import rustworkx as rx

from qiskit.providers import BackendV2, Options
from qiskit.transpiler import Target, InstructionProperties
from qiskit.circuit.library import XGate, SXGate, RZGate, CZGate, ECRGate
from qiskit.circuit import Measure, Delay, Parameter, Reset
from qiskit import QuantumCircuit, transpile
from qiskit.visualization import plot_gate_map

class FakeLOCCBackend(BackendV2):
    """Fake multi chip backend."""

    def __init__(self, distance=3, number_of_chips=3):
        """Instantiate a new fake multi chip backend.

        Args:
            distance (int): The heavy hex code distance to use for each chips'
                coupling map. This number **must** be odd. The distance relates
                to the number of qubits by:
                :math:`n = \\frac{5d^2 - 2d - 1}{2}` where :math:`n` is the
                number of qubits and :math:`d` is the ``distance``
            number_of_chips (int): The number of chips to have in the multichip backend
                each chip will be a heavy hex graph of ``distance`` code distance.
        """
        super().__init__(name="Fake LOCC backend")
        # Create a heavy-hex graph using the
        # rustworkx library, then instantiate a new target
        self._graph = rx.generators.directed_heavy_hex_graph(
            distance, bidirectional=False
        )
        num_qubits = len(self._graph) * number_of_chips
        self._target = Target(
            "Fake multi-chip backend", num_qubits=num_qubits
        )

        # Generate instruction properties for single qubit gates and a measurement, delay,
        #  and reset operation to every qubit in the backend.
        rng = np.random.default_rng(seed=12345678942)
        rz_props = {}
        x_props = {}
        sx_props = {}
        measure_props = {}
        delay_props = {}

        # Add 1q gates. Globally use virtual rz, x, sx, and measure
        for i in range(num_qubits):
            qarg = (i,)
            rz_props[qarg] = InstructionProperties(error=0.0, duration=0.0)
            x_props[qarg] = InstructionProperties(
                error=rng.uniform(1e-6, 1e-4),
                duration=rng.uniform(1e-8, 9e-7),
            )
            sx_props[qarg] = InstructionProperties(
                error=rng.uniform(1e-6, 1e-4),
                duration=rng.uniform(1e-8, 9e-7),
            )
            measure_props[qarg] = InstructionProperties(
                error=rng.uniform(1e-3, 1e-1),
                duration=rng.uniform(1e-8, 9e-7),
            )
            delay_props[qarg] = None
        self._target.add_instruction(XGate(), x_props)
        self._target.add_instruction(SXGate(), sx_props)
        self._target.add_instruction(RZGate(Parameter("theta")), rz_props)
        self._target.add_instruction(Measure(), measure_props)
        self._target.add_instruction(Reset(), measure_props)

        self._target.add_instruction(Delay(Parameter("t")), delay_props)
        # Add chip local 2q gate which is CZ
        cz_props = {}
        for i in range(number_of_chips):
            for root_edge in self._graph.edge_list():
                offset = i * len(self._graph)
                edge = (root_edge[0] + offset, root_edge[1] + offset)
                cz_props[edge] = InstructionProperties(
                    error=rng.uniform(7e-4, 5e-3),
                    duration=rng.uniform(1e-8, 9e-7),
                )
        self._target.add_instruction(CZGate(), cz_props)

        cx_props = {}
        # Add interchip 2q gates which are ecr (effectively CX)
        # First determine which nodes to connect
        node_indices = self._graph.node_indices()
        edge_list = self._graph.edge_list()
        inter_chip_nodes = {}
        for node in node_indices:
            count = 0
            for edge in edge_list:
                if node == edge[0]:
                    count += 1
            if count == 1:
                inter_chip_nodes[node] = count
        # Create inter-chip ecr props
        cx_props = {}
        inter_chip_edges = list(inter_chip_nodes.keys())
        for i in range(1, number_of_chips):
            offset = i * len(self._graph)
            edge = (
                inter_chip_edges[1] + (len(self._graph) * (i - 1)),
                inter_chip_edges[0] + offset,
            )
            cx_props[edge] = InstructionProperties(
                error=rng.uniform(7e-4, 5e-3),
                duration=rng.uniform(1e-8, 9e-7),
            )

        self._target.add_instruction(ECRGate(), cx_props)

    @property
    def target(self):
        return self._target

    @property
    def max_circuits(self):
        return None

    @property
    def graph(self):
        return self._graph

    @classmethod
    def _default_options(cls):
        return Options(shots=1024)

    def run(self, circuit, **kwargs):
        raise NotImplementedError(
            "This backend does not contain a run method"
        )
Visualizzare i backend
Puoi visualizzare il grafo di connettività di questa nuova classe con il metodo plot_gate_map() del modulo qiskit.visualization. Questo metodo, insieme a plot_coupling_map() e plot_circuit_layout(), sono strumenti utili per visualizzare la disposizione dei qubit di un backend e il modo in cui un circuito è distribuito sui qubit del backend. Questo esempio crea un backend contenente tre piccoli chip heavy-hex. Specifica un insieme di coordinate per disporre i qubit e un insieme di colori personalizzati per i diversi gate a due qubit.
backend = FakeLOCCBackend(3, 3)

target = backend.target
coupling_map_backend = target.build_coupling_map()

coordinates = [
    (3, 1),
    (3, -1),
    (2, -2),
    (1, 1),
    (0, 0),
    (-1, -1),
    (-2, 2),
    (-3, 1),
    (-3, -1),
    (2, 1),
    (1, -1),
    (-1, 1),
    (-2, -1),
    (3, 0),
    (2, -1),
    (0, 1),
    (0, -1),
    (-2, 1),
    (-3, 0),
]

single_qubit_coordinates = []
total_qubit_coordinates = []

for coordinate in coordinates:
    total_qubit_coordinates.append(coordinate)

for coordinate in coordinates:
    total_qubit_coordinates.append(
        (-1 * coordinate[0] + 1, coordinate[1] + 4)
    )

for coordinate in coordinates:
    total_qubit_coordinates.append((coordinate[0], coordinate[1] + 8))

line_colors = ["#adaaab" for edge in coupling_map_backend.get_edges()]
ecr_edges = []

# Get tuples for the edges which have an ecr instruction attached
for instruction in target.instructions:
    if instruction[0].name == "ecr":
        ecr_edges.append(instruction[1])

for i, edge in enumerate(coupling_map_backend.get_edges()):
    if edge in ecr_edges:
        line_colors[i] = "#000000"
print(backend.name)
plot_gate_map(
    backend,
    plot_directed=True,
    qubit_coordinates=total_qubit_coordinates,
    line_color=line_colors,
)
Fake LOCC backend
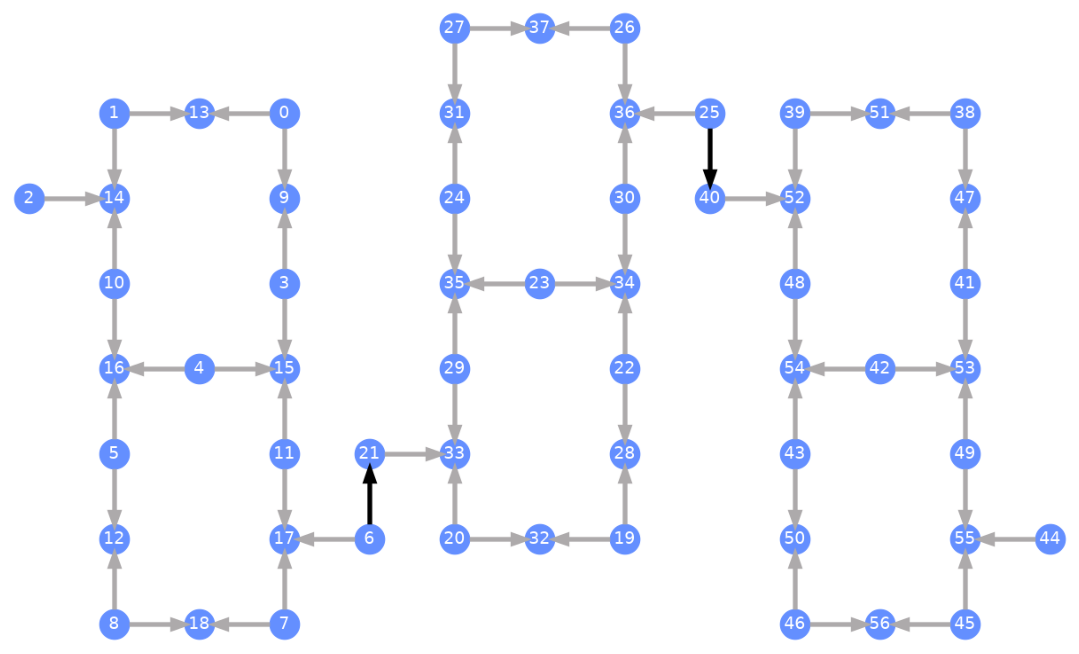
Ogni qubit è etichettato e le frecce colorate rappresentano i gate a due qubit. Le frecce grigie sono i gate CZ e le frecce nere sono i gate CX inter-chip (che collegano i qubit e ). La direzione della freccia indica la direzione predefinita in cui questi gate vengono eseguiti; specifica quali qubit sono control/target per default in ogni canale a due qubit.
Transpilare su backend personalizzati
Ora che è stato definito un backend personalizzato con il suo Target unico, è semplice transpilare circuiti quantistici su questo backend, poiché tutti i vincoli rilevanti (basis gate, connettività dei qubit e così via) necessari per i pass del Transpiler sono contenuti in questo attributo. L'esempio successivo costruisce un circuito che crea un grande stato GHZ e lo transpila sul backend costruito in precedenza.
from qiskit.transpiler import generate_preset_pass_manager

num_qubits = 50
ghz = QuantumCircuit(num_qubits)
ghz.h(range(num_qubits))
ghz.cx(0, range(1, num_qubits))
op_counts = ghz.count_ops()

print("Pre-Transpilation: ")
print(f"CX gates: {op_counts['cx']}")
print(f"H gates: {op_counts['h']}")
print("\n", 30 * "#", "\n")

pm = generate_preset_pass_manager(optimization_level=3, backend=backend)
transpiled_ghz = pm.run(ghz)
op_counts = transpiled_ghz.count_ops()

print("Post-Transpilation: ")
print(f"CZ gates: {op_counts['cz']}")
print(f"ECR gates: {op_counts['ecr']}")
print(f"SX gates: {op_counts['sx']}")
print(f"RZ gates: {op_counts['rz']}")
Pre-Transpilation:
CX gates: 49
H gates: 50

 ##############################
Post-Transpilation:
CZ gates: 146
ECR gates: 6
SX gates: 302
RZ gates: 250
Il circuito transpilato contiene ora una combinazione di gate CZ e ECR, che abbiamo specificato come basis gate nel Target del backend. Ci sono anche molti più gate rispetto a quelli di partenza, a causa della necessità di inserire istruzioni SWAP dopo aver scelto un layout. Di seguito, lo strumento di visualizzazione plot_circuit_layout() viene utilizzato per indicare quali qubit e canali a due qubit sono stati utilizzati in questo circuito.
from qiskit.visualization import plot_circuit_layout

plot_circuit_layout(
    transpiled_ghz, backend, qubit_coordinates=total_qubit_coordinates
)

Creare backend unici
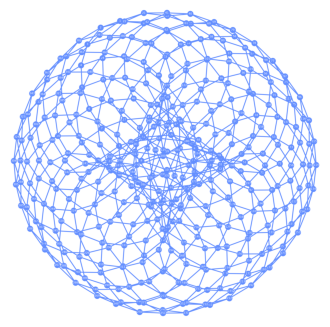
Il pacchetto rustworkx contiene un'ampia libreria di grafi diversi e consente la creazione di grafi personalizzati. Il codice visivamente interessante qui sotto crea un backend ispirato al codice torico. Puoi poi visualizzare il backend usando le funzioni della sezione Visualizzare i backend.
class FakeTorusBackend(BackendV2):
    """Fake multi chip backend."""

    def __init__(self):
        """Instantiate a new backend that is inspired by a toric code"""
        super().__init__(name="Fake LOCC backend")
        graph = rx.generators.directed_grid_graph(20, 20)
        for column in range(20):
            graph.add_edge(column, 19 * 20 + column, None)
        for row in range(20):
            graph.add_edge(row * 20, row * 20 + 19, None)
        num_qubits = len(graph)
        rng = np.random.default_rng(seed=12345678942)
        rz_props = {}
        x_props = {}
        sx_props = {}
        measure_props = {}
        delay_props = {}
        self._target = Target("Fake Kookaburra", num_qubits=num_qubits)
        # Add 1q gates. Globally use virtual rz, x, sx, and measure
        for i in range(num_qubits):
            qarg = (i,)
            rz_props[qarg] = InstructionProperties(error=0.0, duration=0.0)
            x_props[qarg] = InstructionProperties(
                error=rng.uniform(1e-6, 1e-4),
                duration=rng.uniform(1e-8, 9e-7),
            )
            sx_props[qarg] = InstructionProperties(
                error=rng.uniform(1e-6, 1e-4),
                duration=rng.uniform(1e-8, 9e-7),
            )
            measure_props[qarg] = InstructionProperties(
                error=rng.uniform(1e-3, 1e-1),
                duration=rng.uniform(1e-8, 9e-7),
            )
            delay_props[qarg] = None
        self._target.add_instruction(XGate(), x_props)
        self._target.add_instruction(SXGate(), sx_props)
        self._target.add_instruction(RZGate(Parameter("theta")), rz_props)
        self._target.add_instruction(Measure(), measure_props)
        self._target.add_instruction(Reset(), measure_props)
        self._target.add_instruction(Delay(Parameter("t")), delay_props)
        cz_props = {}
        for edge in graph.edge_list():
            cz_props[edge] = InstructionProperties(
                error=rng.uniform(7e-4, 5e-3),
                duration=rng.uniform(1e-8, 9e-7),
            )
        self._target.add_instruction(CZGate(), cz_props)

    @property
    def target(self):
        return self._target

    @property
    def max_circuits(self):
        return None

    @classmethod
    def _default_options(cls):
        return Options(shots=1024)

    def run(self, circuit, **kwargs):
        raise NotImplementedError("Lasciate ogne speranza, voi ch'intrate")
backend = FakeTorusBackend()
# We set `figsize` to a smaller size to make the documentation website faster
# to load. Normally, you do not need to set the argument.
plot_gate_map(backend, figsize=(4, 4))
num_qubits = int(backend.num_qubits / 2)
full_device_bv = QuantumCircuit(num_qubits, num_qubits - 1)
full_device_bv.x(num_qubits - 1)
full_device_bv.h(range(num_qubits))
full_device_bv.cx(range(num_qubits - 1), num_qubits - 1)
full_device_bv.h(range(num_qubits))
full_device_bv.measure(range(num_qubits - 1), range(num_qubits - 1))
tqc = transpile(full_device_bv, backend, optimization_level=3)
op_counts = tqc.count_ops()
print(f"CZ gates: {op_counts['cz']}")
print(f"X gates: {op_counts['x']}")
print(f"SX gates: {op_counts['sx']}")
print(f"RZ gates: {op_counts['rz']}")
CZ gates: 834
X gates: 18
SX gates: 1534
RZ gates: 1150